Ranglana Peak Expedition
6 Lakh+
Satisfied Trekkers
16+
Years of Experiance
1300+
Google Reviews
800+
Tripadvisor Reviews
Duration
17 Days
Difficulty
Difficult
Max Altitude
5554 m
Region
Uttarakhand | India
Pickup
Dehradun (Prince Chowk)
Best Season
Summer | Autumn | Monsoon
Quick Information
Trek Duration
17 Days
Trek Difficulty
Difficult
Trek Group Size
12 max
Trek Distance
70 Km
Trek Max Altitude
5554 m
Trek Region
Uttarakhand | India
Trek Pickup
Dehradun (Prince Chowk)
Best Season
Summer | Autumn | Monsoon
Best Time
May, October
Trek Basecamp
Uttarakhand
Trek Insurance Fee
₹ 0
Trek Shield Fee
₹ 0
Trek Transportation Fee
₹ 0
Trek Backpack Fee
₹ 0
GST Fee
5%
Ranglana Peak Expedition Overview
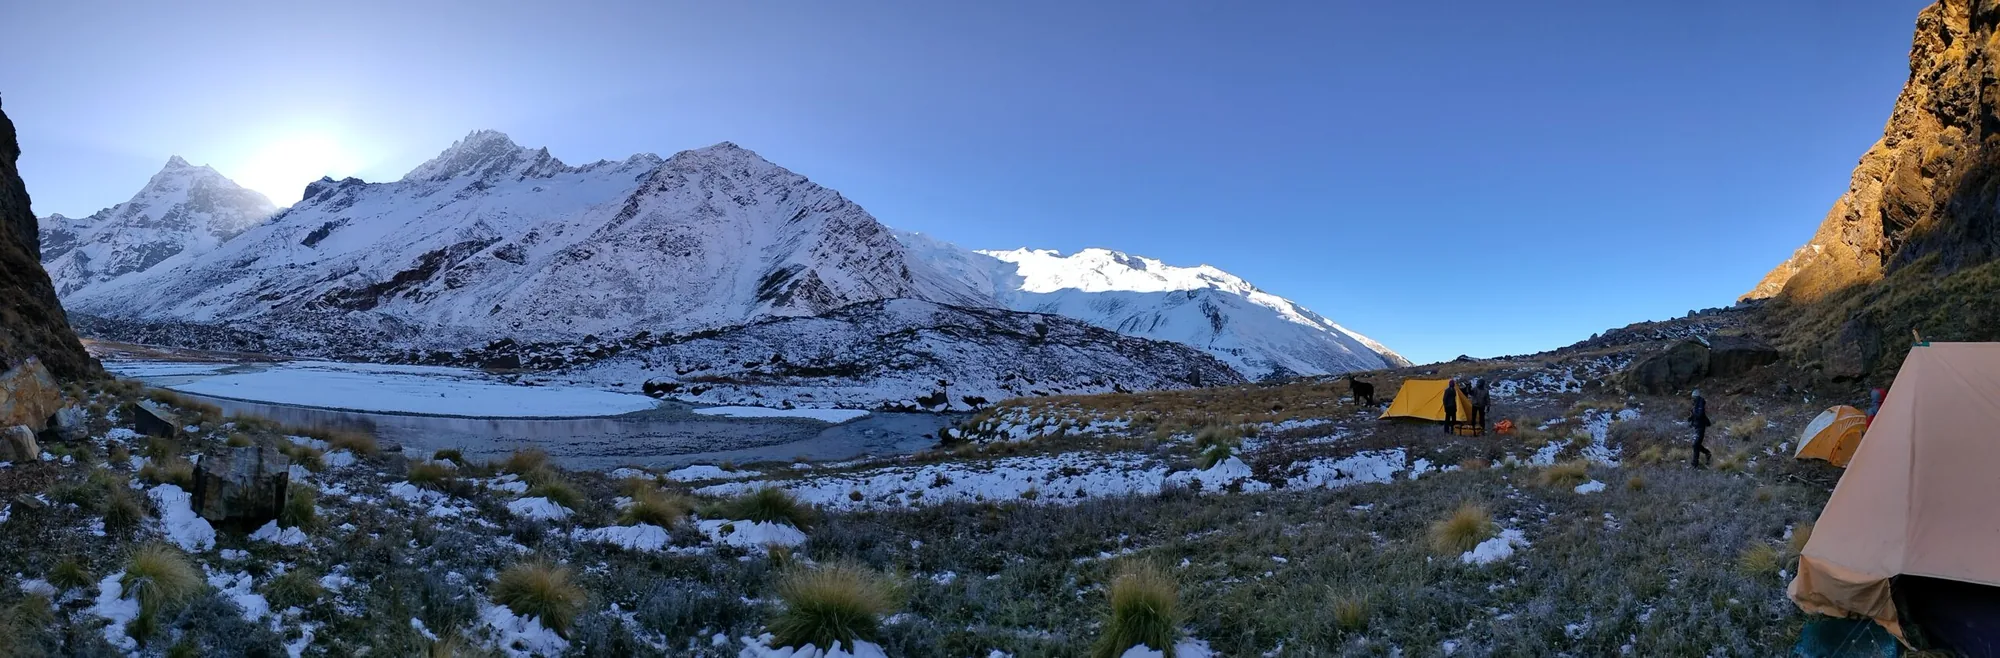
Ranglana Peak is one of the most beautiful and adventurous expeditions of the Indian Himalayas. This beautiful Himalayan peak is located in the Garhwal division of Uttarakhand. The Ranglana PeakExpedition has an altitude of 5554 m and is beloved by seasoned trekkers and mountaineers. This is a raw beauty and is known for its challenging terrain. Ranglana Peak is situated in the Rupin-Supin Valley of Uttarkashi. This expedition is the perfect fusion of adventurous trails, culture, and serene landscapes. Ranglana Peak expedition is not just a trek but an exploration of unspoiled wilderness.
The Ranglana Peak Expedition is rich in biodiversity and culture. You can witness the centuries-old traditions, rare flora, and fauna. This peak is less explored due to the difficulty level. The expedition is less crowded and very pristine. You will start your journey through oak and pine forests. After crossing the lush green forests, you will enter beautiful meadows. In the monsoon, these meadows fill with wildflowers, offering a picture-perfect scene. After some ascent, you will get a huge change in the views as the meadows will change to snowfields. Ranglana Peak Expedition offers panoramic views of Swargarohini, Kalanag, and Bandarpunch peaks.

History Of Ranglana Peak Expedition
Ranglana Peak Expedition is a majestic yet lesser-known expedition of our country. The locals living in nearby villages like Dhaundan and Supin believed that Rangalan Peak is very sacred. Locals consider Rangalan Peak to be the home to their local deities. Uttarakhand is home to many famous high-altitude expeditions, but Ranglana Peak remained untouched for a very long time. The history of Ranglana Peak depends more on the local exploration and recent mountaineering activities. The word Ranglana means vibrant hues of the alpine landscape and the reddish tones of the sunrise.
The Ranglana peak exploration gained attention in the early 2000s. After expediting all famous peaks, the mountaineer community started exploring offbeat locations. Local guides documented the first Ranglana peak expedition. This documentation was more for exploration. Today, the Ranglana peak expedition is emerging as an introductory mountaineering expedition. This is a perfect introductory expedition for future climbers. The trail passes through forests, moraines, and snowfields, making it a perfect choice for new mountaineers. Today, Ranglana Peak is emerging as a perfect expedition with a fusion of raw nature, tradition, and mountaineering spirit.
Highlights Of Ranglana Peak Expedition
Hidden Gem of Uttarakhand
Ranglana Peak is one of the most majestic expeditions of Uttarakhand. This is a lesser-known peak that offers untouched natural beauty. Ranglana Peak is not explored by many people, making it a perfect place for people who don’t like crowds. This expedition can be a perfect blend of beauty and adventure.
Panoramic Himalayan Views
The trail to Ranglana Peak Expedition offers a majestic view of the Himalayan Peaks. When you start ascending to high-altitude areas, you will get picture-perfect views of Swargarohini, Black Peak, and Bandarpoonch. The sunrise is very stunning as you will get a 360-degree view of the Himalayan ranges.
Diverse Landscape
You will start your summit through dense pine and oak forests. Once you cross the forest area, beautiful alpine meadows will welcome you. You may also witness shepherds with their herds in these big alpine meadows. When you ascend further, you will be walking on icy streams and glacial zones.
Rich Culture
This part of Uttarakhand still holds roots to centuries-old traditions and customs. Your trail passes through beautiful villages like Supin and Dhaundar, where you can witness the traditional Himalayan culture. You can feel the culture in their food, architecture, and even in their lifestyle. These locals are also known for their great hospitality.
Difficulty Level Of Ranglana Peak Expedition
Ranglana Peak Expedition is rated as a Difficult expedition. This expedition is suitable for seasoned trekkers and mountaineers. The high altitude and length of this expedition increase the difficulty level. Trekkers should gain good experience in high-altitude treks before attempting the Ranglana Peak Expedition.
High-Altitude Expedition
The major factor that increases the difficulty level is the altitude. This peak stands at a height of 5554 m, where the oxygen level can drop significantly. Most climbers start getting AMS symptoms after reaching 4000 m. Getting AMS symptoms like headache, nausea, and fatigue is common in this expedition. Trekkers should acclimate properly for summiting Ranglana Peak. The weather at high altitudes is also very unpredictable.
Difficult Terrain
The trail to Ranglana Peak Expedition passes through different terrains. You will start your trek from easy sections like forests, trails, and meadows. When you ascend to a higher altitude, you will be walking on moraine and snowfields. The final summit ridge is very challenging as you have to pass steep snow slopes.
Technical Climbing
Ranglana Peak Expedition does not require high climbing skills, but the trekkers should be familiar with basic mountaineering knowledge. The final summit push requires basic technical gear like an ice axe, crampons, a harness, ropes, etc. You have to pass the snow and ice section from the base camp to the peak.
Best Time To Visit The Ranglana Peak Expedition
The best time to plan the Ranglana Peak Expedition is during the early monsoon. The weather will be pleasant, and the trails will be dry. Another good time can be post-monsoon, when the views will be clear and the expedition can be more joyful. In winter, you can’t do the Ranglana Peak Expedition as this region becomes inaccessible due to heavy snowfall.
- Ranglana Peak Expedition from Mid-May to Late June
Pre-monsoon is the best time to summit Ranglana Peak. The sky will be clear and there will be less possibility of rain. The temperature will be pleasant in the daytime, and you can still find fresh snow in the high-altitude areas. This is an ideal time for mountaineers and snow-trekking experts.
- Ranglana Peak Expedition from July to Mid-September
Planning the Ranglana Peak Expedition in the monsoon is not recommended. During the monsoon, the lower altitude areas receive a good amount of rain. It makes the trail slippery and prone to landslides.
- Ranglana Peak Expedition from Mid-September to Mid-October
You can also plan your expedition post-monsoon. The trail will start drying up, and you can see clear views of Swargarohini and other Himalayan peaks. There will be less snow and more rocky trails. This season is suitable for people who are new to snow walking.
How To Reach Ranglana Peak Expedition
You will start your Ranglana Peak Expedition from Sankri. This small village is known for its traditional wooden houses and centuries-old culture. The major city near Sankri is Dehradun. You can reach Dehradun by various means of transport.
Sankri via Road
Sankri is well-connected to cities by road. You can find a few buses to Sankri from Dehradun. To reach Sankri, look for the buses to Dehradun. You can find government and bus services to Dehradun from Delhi, Chandigarh, and various other major cities. From Dehradun, take a bus or shared taxi to Sankri.
Sankri via Train
The nearest railway station to Sankri is Dehradun Railway Station. This railway station is well-connected to various metro cities like Delhi, Lucknow, Mumbai, Kolkata, etc. Some express trains like Shatabdi Express, Nanda Devi Express, etc, are available from Delhi daily. After reaching Dehradun, look for a shared taxi to Sankri.
Sankri via Air
The nearest airport to Sankri is Jolly Grant Airport (Dehradun). You can find direct flights to Dehradun from all major cities. Take a flight to Dehradun and then take a taxi to the ISBT. Now look for a bus or shared taxi to Sankri.
Things To Carry In The Ranglana Peak Expedition
Ranglana Peak Expedition is a long expedition, and trekkers require the right gear to make it a success safely. The expedition passes through forests, meadows, snowfields, and glacial sections. You should pack your pack with carefully selected items.
- Clothing
Get a backpack (65 L) that can provide good back support. Your bag should be waterproof. Now pack 2-3 quick dry t-shirts and 2 pairs of thermals (upper and bottom). Pack 2 fleece jackets and one down jacket. You can also pack a woolen sweater for extra warmth. For the outer layer, you should get a waterproof and windproof jacket. Get a poncho and waterproof trekking pants for unexpected rain. Now pack a woolen beanie, sun cap, and two pairs of woolen gloves.
- Footwear
Get comfortable trekking shoes with good grip and ankle support. Now pack a pair of gaiters for crossing snow sections. Pack 5-6 pairs of socks (woolen and cotton). You should also pack a pair of sandals for the campsite.
- Personal Care
For personal items, start with a toothbrush, soap, and toothpaste. Now pack a quick dry towel, toilet paper, and hand sanitizer. Carry good sunscreen, moisturizer, and lip balm. Make a small first-aid kit with diamox, painkillers, muscle relaxant spray, band-aid, etc. You can also pack a small foldable daypack (20L) for summit day.
More Information
Ranglana Peak Expedition Itinerary
We start early from Dehradun and head to Mussoorie, passing by the Lakhamandal temple, linked to the Mahabharata legend. Along the way, we encounter villages like Damta, Purola, Mori, and Netwar. The Yamuna river accompanies us till Purola, the last major settlement with a market. It’s advisable to grab any essentials here. Mobile networks work up until Purola.
Post-Purola, we drive through a scenic pine forest, catching sight of Jawahar Navodaya Vidyalaya on a hilltop. Near Mori, we find the Netwar river, and the temperature drops. Crossing the Netwar check post, we officially enter Govind Pashu Vihar Wildlife Sanctuary, a key access point for treks in the region. The sanctuary’s northern border meets Himachal Pradesh. Here, Rupin and Supin rivers merge to form Tons, a major tributary of Yamuna.
We arrive in Sankri by early evening, a charming village with a central market and apple orchards. Swargarohini peak is visible on clear days. We rest in a guest house or camps for the night.
We kickstart the day early, making our way to the Obra Thatch campsite. It’s a fairly easy trek with lovely river views and nice spots to take a breather. We arrive at the campsite in the afternoon, leaving us plenty of time to set up and relax. If it’s a sunny day, you might want to dip into the river for a refreshing splash.
Once in Sikolta, drop your bags and venture on a side trip to the famous Juda ka Talab lake, a must-see for trekkers.
On the second day of trekking, get ready for the longest journey with a significant climb in altitude. We’ll start by ascending through a dense pine forest. As we go, the scenery transforms into a breathtaking open valley with stunning views of towering snow-capped peaks. Our destination for the day is Bhawa Waterfall, a majestic sight cutting across a mountainside where we’ll set up camp.
If you’re trekking in the summer, keep an eye out for wild strawberries along the way. The path leads through patches of rhododendrons, opening up to the lush green meadow of Bhoj Gadi. This campsite, framed by purple-grey mountains and snowy peaks, is one of the most picturesque spots on any Himalayan trail. Take some time to explore the area, perhaps striking a pose with an intriguing arrangement of stones and a log, or simply sit back and soak in the tranquility.
This day is the trek’s highlight. After an hour from Bhoj Gadi, we descend to the iconic Phulara Ridge. A ridge is a chain of mountains that form a continuous crest, with narrow edges dropping into valleys on either side. This gives you a clear view of the stunning Garhwal Himalayan ranges, including Swargarohini and Bandarpoonch, in three directions. It’s truly awe-inspiring.
Once the ridge ends, you enter the vast, rolling Pushtara meadows, a liberating sight after the exhilarating ridge walk. As we continue up the valley, we’re greeted by one waterfall after another, leading us to the Dev Kyara campsite, bringing us closer to Mount Ranglana (5,554 meters). The final stretch over boulders and rocks may be a bit tiring, but the alpine flowers here are a refreshing sight. When the valley opens up, the views of the majestic Ranglana Peak at the head of the valley are breathtaking.. We’ll camp at Dev Kyara, where you can take a day to explore the valley or climb nearby rocky outcrops.”
we’ll trek from Devkiyara (4100 m) to Camp 1 (4687 m). This leg of the journey involves ascending to a higher altitude. The terrain may include rocky sections and possibly some snow patches, depending on the season.
The trek will take you through the stunning landscape of the high Himalayas, offering breathtaking views along the way. It’s important to pace yourself and stay well-hydrated as you make your way to Camp 1.
Once you reach Camp 1, take some time to rest, rehydrate, and acclimatize to the higher altitude. Enjoy the spectacular surroundings and prepare for the next day’s adventure. Remember to follow any instructions provided by your trekking guide or team leaders to ensure a safe and enjoyable experience.
Start the day with a gentle acclimatization activity around Camp 1. This could include short hikes, breathing exercises, or light stretching to help your body adjust to the higher altitudeSpend some time resting at Camp 1. Take this opportunity to hydrate well and nourish your body with balanced meals..Take a leisurely stroll around Camp 1 to enjoy the stunning views and immerse yourself in the natural beauty of the surroundings. It’s also an excellent opportunity for photography.
Start the trek, ascending through the mountainous terrain. The path may include rocky sections and possibly some snow patches. Take in the breathtaking views of the surrounding peaks and landscapes.Stay well-hydrated throughout the trek. Take regular breaks for water and snacks to maintain your energy levels.
Arrive at Camp 2 (4950 m) in the afternoon. Take some time to rest, rehydrate, and acclimatize to the higher altitude.Arrive at Camp 2 (4950 m) in the afternoon. Take some time to rest, rehydrate, and acclimatize to the higher altitude.Attend a briefing in the evening where your expedition leaders will discuss the plan for the next day, including the route, estimated time of departure, and any specific instructions for the ascent to the summit.
may involve navigating through challenging terrain, including steep slopes and rocky patches.The term “Load Ferry” suggests that this stage may involve carrying equipment, supplies, or loads to establish a higher camp in preparation for the final summit push.
Upon reaching the summit camp, allocate time to set up tents and arrange the campsite for the night. Rest and acclimatize at the summit camp. Acclimatization is crucial, especially at higher altitudes.
Have a hearty and nutritious breakfast to fuel your body for the strenuous ascent. Embark on the demanding climb towards the Summit Camp. This section of the trek will likely be the most challenging, involving steep slopes, potentially icy or rocky terrain, and high altitudes.
Pay close attention to your pacing. Move at a steady and sustainable pace, taking regular breaks to catch your breath and acclimatize to the thinning air. Reach the Summit Camp, which may be located at a higher altitude, where you’ll set up tents and establish a base for the summit attempt. Take some time to rest, rehydrate, and acclimatize.
Begin the day with a gentle acclimatization activity around the Summit Camp. This could include short hikes, breathing exercises, or light stretching to help your body adjust to the extreme altitude.Spend some time resting at the Summit Camp. Focus on staying well-hydrated and consume balanced meals to nourish your body for the challenging ascent Engage in a briefing or educational session conducted by your expedition leaders. This may cover important topics like altitude sickness prevention, emergency procedures, and safety protocols specific to the summit day. Go over the summit route with your expedition leaders, discussing any potential challenges, key landmarks, and important safety measures.
Begin well before dawn, typically in the early hours of the morning, to take advantage of stable weather conditions and ensure ample time for the ascent.Have a light, easily digestible breakfast to provide initial energy for the climb.Ensure your headlamp is functioning properly, and carry spare batteries. Check harnesses, ropes, and other safety equipment.
Begin the ascent towards the summit, following the predetermined route discussed in the briefing. This part of the climb may be the most challenging, involving steep sections and potentially icy or rocky terrain.
Maintain a steady but sustainable pace. Take regular breaks to rest, hydrate, and refuel with energy-rich snacks.
Celebrate your achievement as you reach the summit! Take in the breathtaking views and capture the moment with photos. After spending a reasonable amount of time at the summit, begin your descent to ensure you have ample time to safely return to the Summit Camp.Be cautious while descending, as it can be equally challenging. Use proper techniques and equipment to ensure a safe return.
Return to the Summit Camp, where you can rest, rehydrate, and reflect on your successful summit attempt.
The day reserved for the summit attempt is a critical stage of the expedition.
The day reserved for the summit attempt is a critical stage of the expedition.
Start the day early, beginning your descent from the Summit Camp. Descending can be physically demanding, so proceed with caution and use proper techniques. Maintain open communication with your team members and leaders during the descent.Take in the scenic views as you descend. The landscape may look different from this perspective, offering new perspectives of the terrain.
Reach Camp 1, where you’ll set up tents and establish a base for the night. Take some time to rest, rehydrate, and reflect on your successful summit attempt.
Start the descent from Camp 1. You’ll be navigating through the terrain you ascended earlier in the expedition, but this time heading downhill.Take in the changing landscape as you descend. You’ll notice different perspectives and views compared to your ascent.Reach Obra, marking the end of your trek. Settle into your accommodations or designated area for rest.
Early in the morning, we leave the campsite . The walk is downhill and hence takes lesser time than before. We walk alongside the River until we finally arrive at the place where we started the trekking Journey, from where a vehicle takes us back to Sankri. We retire for the day in camp alongside the river or in a guest house in Sankri.
Expedition of Ranglana Peak concludes today as we leave Sankri and reach Dehradun by late afternoon.
Inclusions & Exclusions
Our treks are specially designed by the experienced team at Himalaya Shelter, taking you on an adventure of a lifetime all while making you connect not only with the bountiful nature but also with yourself and with others on the trek with you, creating wonderful memories which will last you a lifetime. All Himalaya Shelter treks are guided by experienced Trekkers having vast knowledge and experience of the region, providing with insightful information and stories pertaining to the region’s flora and fauna and the history of the region, whilst on the trek. It is safe to say that on successfully completing the trek, one will gain tremendous insight and experience along with lifetime memories.
Trek Package Inclusions
- Transport - Support from Dehradun, Pickup time: 7:30 am, Prince Chowk, Near Dehradun Railway Station
- Accommodation – At Base Camp, stay at a local homestay or guest house for one night each, which will give you an insight into the authentic lifestyle of the locals. (INR 5000 per person extra for single sharing throughout the trek)
On Trek stay in a 2-person Vango Halo Pro/A-Shape tent, which is to be shared by two trekkers, built to withstand extreme weather conditions and at the same time making you comfortable after a hard day’s trek. - Camping Equipment – specially designed sleeping bags that can withstand harsh weather conditions, foam mattresses. Other safety gear like microspikes, gaiters, an ice axe, and helmets will be provided.
- Medical Kit – our team will be equipped with an extensive medical kit, which our team is trained and experienced to use. Oxygen cylinders are used after they are thoroughly inspected throughout the Trek. Even campsites have large oxygen cylinders as backups.
- Permission - Forest entry charges for Indian nationals (Additional charges will be applicable for international tourists)
- Meals – Breakfast, packed lunch (on trek days), evening snacks, and dinner will be served. A hearty, delicious, and nutrition-filled Veg meals with egg preparation will be provided throughout the trek. (Jain and Vegan Food can also be arranged on prior notification.)There will be a dedicated Kitchen Tent along with a dining tent, which will have a dining table too.
- Our Team – A highly experienced and AMC-certified Trek Leader who will help ensure that the entire trek goes smoothly and safely while navigating the challenging conditions during the trek, and is skilled enough to navigate any medical emergency that can arise during the trek. Local and route Guides who are well-versed with the region and provide an in-depth insight into the local customs and knowledge of the flora and fauna endemic to the region. A dedicated Kitchen staff, which includes a Cook, a helper, and other support staff. There will also be porters and mules to carry common equipment.
- Cloakroom - We have a cloakroom facility available for extra luggage. Every trekker is permitted to leave their luggage behind at no charge.
Exclusions
- Personal expenses like tips, personal medicines, phone calls etc.
- Travel Expenses - Travel expenses from your hometown to the mentioned Pick-Up Point are not included in the trek fee.
From the scheduled pick-up spot to the base camp, we have our own fleet of vehicles like Bolero, Innova, Dezire, or Tempo Traveler (12-seater). This is be shared by trekkers for a pre-decided amount. All vehicles are non-AC. - Personal Equipment - Any personal gear like jackets, shoes, cutlery, or backpacks are not included in the trek fee. We recommend renting them from our Rental Store for an affordable fee. This can be pre-arranged to avoid last-minute hang-ups.
- Offloading - We encourage carrying your backpack to get into the true spirit of trekking. However, if needed, you can opt to offload your personal luggage of up to 12 kgs for an additional cost of INR 400 per bag per day.
- Trek Insurance - A mandatory trek insurance fee is charged in addition to your trek fee. Since most medical insurance doesn’t cover adventure activities, trek insurance offers essential coverage, enhancing your safety without a significant financial burden.
- Buffer day on the trek - We have kept a buffer day on the trek to account for any weather-related delay. If this is utilized, you will need to pay an extra amount to your trek leader.
- Anything apart from inclusions
- Please carry a lunch box for a packed lunch/breakfast to avoid using polythene and Aluminium foil.
Keeping the Himalayas clean is our own responsibility. Reduce the use of Plastic when you are in the abode of the Sacred Himalaya. 🌱
Videos
!
Exceting Videos coming Soon
We’re currently working on putting together all the details for this trek 🎥 Stay tuned, exciting videos covering everything you need to know will be coming your way very soon!
More treks like Ranglana Peak Expedition
Customer Reviews

Deepika Garg
5.0
We booked binog tibba trek with Himalayan shelter . It was a very smooth process from booking to experiencing the trek . Our trek coordinator mr. Manish was just awesome .

tanush choudhary
5.0
My experience with himalayanshelter was great. We were the first batch of 2026 to complete the Bali Pass trek. Since the rest of the group cancelled due to the weather, there were only two of us, but the team still provided all the facilities as promised. Our trek leaders, Sonu Bhai and Suraj Bhai, were amazing. They guided us throughout the trail and shared a lot of knowledge about the mountains, trails, and wildlife, which made the experience even better. This was my second trek with himalayanshelter, and I’ll definitely be coming back to them for my next adventure.

Rahul jani
5.0
⭐⭐⭐⭐⭐ Just completed the unforgettable Fulara Ridge Trek with Himalaya Shelter, and it was truly one of the best trekking experiences of my life! The entire team of Himalaya Shelter is extremely professional, talented, cooperative, and always ready to help at any moment. Their dedication towards trekkers’ safety, comfort, and happiness is simply outstanding. Even during very heavy rain conditions, the team worked tirelessly and prepared hot, delicious food for all of us with great care and positivity. Their hospitality and commitment were truly heart-touching. A very special appreciation for our trek leader PK Sir — his work was absolutely excellent! He is highly experienced, multi-talented, energetic, motivating, and always supportive throughout the trek. His guidance, leadership, and caring nature made the entire journey safe, enjoyable, and memorable. The whole support staff and guide team deserve huge respect for their hard work and teamwork. Every member of the team was smiling, encouraging, and ready to support us anytime. Thank you, Himalaya Shelter, for giving us such an amazing and lifetime memorable experience at Fulara Ridge. Highly recommended for anyone who loves trekking and adventure! Looking forward to many more adventures with Himalaya Shelter again. ❤️🏔️

Krishnaraj Jhala
5.0
A very personalised service beyond our expectations. Track lead PK, cook Jagdish, Rocky Rana at the base camp and Rinku were always ready to do anything that we wanted.Jagdish is an excellent cook always with a smile on his face. Hope you will keep serving with same passion and personal touch.


Jayant Bahulekar
5.0
We went to Dayarabugyal trek. Arrangement during trek was nice, it was 4 people kind of solo trek arrangement made for us. The Cook Jaggu was amazing, we never felt away from home. Trek guide Tanisha was also helpful. Thanks!

Sunshriya Tomar
5.0
I had a wonderful experience on har ki dun trek , i would highly recommend all my friends to go on a trek with himalaya shelter only The guide we had during the trek was suraj, he is a wonderful, helpful and knowledgeable guide . Also the guy prakhar with the himalaya shelter team was very nice and friendly with us , he made sure that every wonderful moment was captured Also other team members of this company were very cheerful and helpful in nature At last , for me it was a life long remembering moment

Dhruv Rajdev
5.0
One of the best trek of my life The guide was the best (suraj) he made sure everyone’s safety and the food was the best i ever had on trek and the camera guy was so nice (prakhar) he made sure that no moment was missed Thanks you Himalayan shelter and team for making my trip one of the best trip of my life

rahul mishra
5.0
Excellent experience. We did Bali pass trek with them. were first group to summit after heavy snow in which many group returned. They cattered to our small group of 3. Second trek with them. Highly recommend.

Shalin Thacker
5.0
great experience with Himalayan shelters during our recent visit to Bali Pass Trek. Great support from Suraj and Mukesh throughout our journey.

Vaibhav Pareek
5.0
We successfully completed Bali Pass Trek through Himalaya Shelter. A big Thank You to Mukesh and Suraj for ensuring highest levels of safety and comfort throughout the journey. Both of them are certified mountaineers. The fresh food prepared by Bablu Mama felt like a blessing throughout the journey, as we crossed the 16200 feet pass. This trekking organization is meticulously managed and operated by the down to earth entrepreneur Bachan Rana from Osla. The entire team shows great commitment towards the wellbeing of their guests. I strongly recommend Himalaya Shelter for any High Altitude trek or expedition.

Pranav Yaguvakota
5.0
It was an amazing experience, the trek was very well planned, we had an amazing crew to keep watch, of us our guide sonu negi was very experienced on high altitude and technical treks, this being our first high altitude trek it was quite an experience staying in tents which were set up before we got there, really delicious food made by our cook sanjay gave us freshly made hot food. And a helper along with us named vivek who was a local. The trek difficulty was moderate, on the surya top we got an amazing view of the gangotri and yamunotri ranges. The locations of the tents were very strategically well set up by the advice of sonu. He made sure we were all hydrated and well kept , All in all we thank himalayan shelters for making our experience very comfortable.

Anjali Yadav
5.0
I had an amazing experience on the har ki dun trek with himalayashelter. The whole team was very helpful, guides were caring and supportive, good homemade food , warm local hospitality . It was a very homely environment and i loved every bit of it

Ashank Gawade
5.0
Outstanding Customised Surya Top Trek with Himalaya Shelter – Premium Gear, Elite Guides & Exceptional Food! We recently completed the stunning Surya Top Trek organized by Himalaya Shelter, and they completely exceeded my expectations. If anyone wants a tailored and personalised, safe and premium trekking experience to this 12,900-foot peak, this company is as good as it gets. Perfectly Customised Itinerary. From the initial planning stages, the team at Himalaya Shelter was incredibly supportive, adapting the itinerary seamlessly to our group’s specific preferences and pace. They focus on personalized experiences rather than massive, overcrowded commercial batches, allowing us to enjoy the beautiful forests and meadows of the Garhwal region fully. The guide with our team, Sonu Negi, was absolutely phenomenal. He has completed advanced training from the prestigious Himalayan Mountaineering Institute (HMI), and his deep technical knowledge and sharp safety instincts kept us feeling entirely secure. He wasn't just a leader; his encouraging nature, deep familiarity with the terrain, and mountain views (like Mt. Bandarpoonch and the Gangotri range) made the journey unforgettable. Most importantly, he prioritized our safety by proactively carrying portable oxygen and other critical emergency equipment. Since our group of 7 members was ranging from the age of 9 to 73 , this gave our entire group immense peace of mind. The food was an experience in itself. The Backcountry Food by Sanjay our cook, was too good. Massive shoutout to him, who turned our high-altitude campsites into a gourmet kitchen. Every single day, he served up incredibly delicious, fresh, and hot meals that were perfectly planned for the physical demands of a moderate trek. The hygiene standards really good , and having such thoughtful, comforting food waiting for us after a long day of trekking was a total game-changer. Just to show how exceptional the culinary experience was: for fun, Sanjay even prepared fresh puris for Pani Puri right there in the middle of the mountains, and we wrapped up our evenings with warm, delicious Gulab Jamuns as desserts! Treating us to these kinds of treats at high altitude was a level of hospitality we never expected. Talking about the Camping Gear. The quality of the camping equipment provided by Himalaya Shelter is drastically superior to what other mainstream trekking companies offer which I have experienced in my earlier treks. Heavy-duty, clean, double-layered tents that provided excellent insulation and kept us dry against the unpredictable mountain weather. Thick mats and high-quality, cold-rated sleeping bags with fleece inner for the feet that made sleeping in chilly high-altitude conditions genuinely comfortable. Every zipper, tent pole, and piece of technical gear felt in very good condition and maintained very well. Himalaya Shelter perfectly balances top-tier safety, impeccable local hospitality, and premium comfort. I am immensely grateful to Sonu, Sanjay, and the rest of the crew for an unforgettable adventure. I will absolutely be booking my next Himalayan trek with them.

Manish Garg
5.0
27th May 2026.. date saved as Bali Pass Summit with HIMALAYA SHELTER. It was our 04th trek with Himalaya Shelter & as experienced earlier, everything was just superb viz camps, foods, trek management, guide.. SONU (the Trek Leader/Guide), with his experience & acumen, made the trek even more enjoyable & doable. He pushed & motivated us all throughout the trek. Overall an excellent experience with Himalaya Shelter team. Will suggest everyone to go with Himalaya Shelter and see it themselves. All thanks to HIMALAYA SHELTER.

Prasanna Kumar
5.0
We had an Amazing Experience with Himalaya Shelter The Surya Top Trek!! This was our first ever trek to the Himalayas with Himalaya shelter. we recently completed The Surya Top Trek which was a moderate trek and we all managed to finish the trek!! It was truly an unforgettable experience. The trek offered stunning mountain views, peaceful forests, beautiful campsites, and a magical view of the Gangotri And the Yamunotri ranges from the Surya Top. A special thanks to our guide, Sonu Negi, who was experienced, friendly, and extremely supportive throughout the journey. Since this was our first high-altitude trek with 3 nights of wilderness camping, his planning, guidance, and focus on safety made us feel comfortable and confident at every step. Our food was cooked by an marvellous cook Sanju who cooked amazing food throughout our trek and even in our campsites…!! The campsite arrangements, and overall management were excellent. The entire team treated us like family and made the trek even more memorable. Highly recommend Himalaya Shelter for anyone looking for a safe, well-organized, and memorable Himalayan trekking experience!!

Daksh Sundriyal
5.0
For those who want to experience an adventure of a lifetime 💯 recommended. Sonu bhai the coolest guide

Hema Sri
5.0
Bhuran Ghati Trek – Himachal Pradesh Just returned from an amazing trek to Bhuran Ghati with Himalaya Shelter — absolutely loved the experience! Their small group format ensures personal attention to every trekker, making it a safe and comfortable experience for solo travellers and groups alike. Trek lead Bachan Rana was excellent — clear with guidelines and always made sure everyone was safe. Freshly cooked meals on the trail, a luggage offloading option for those who need it, and rental trekking equipment make this one of the most hassle-free treks you can book. Having a female trek lead, Tanisha, is a wonderful touch that makes women and solo female travellers feel much more at ease. Highly recommended for anyone looking for a well-organised, safe, and memorable Himalayan trek! 🏔️

tuhina sen
5.0
Hey we completed B the phulara ridge trek and safely reached Dehradun today. We enjoyed the trek throughout. The trails, the forest, the ridge walk was thrilling. I would like to extend my heartfelt appreciation for the trek guide Sooraj and the support staff, cook for arranging the trek and supporting us throughout . Sooraj was polite and patient always especially with my son who is 8 and was doing his first trek. He kept entertaining us with all information about different flora and fauna while walking through the forest trails. The cook served tasty meals always and we loved eating local vegetables plucked from the forest. Overall we had a wonderful experience. Thank you .

Haritha N R
5.0
The team was soo good. Food and service also absolutely fine. And it's very safe for girls even if they are in a solo trip

ajit yadav
5.0
One of the best and trusted team to go with , Manisha and Tripian ranna have nothing but supportive and kind towards us , they were ready to help us in every moment. It's amazing how this company create environment of fun and adventure. Doing all my treks with them in future.

satish gondhalekar
5.0
Himalayan shelter is a local sankri based Adventure tourism company. They have deep knowledge of region, staff is professional and helping, indeed it was a great trek Thanks All

Shubhadeep Ghosh
5.0
Over the phone call / whatsapp, the plan was very detailed. The Trekking charges were clearly spelt out and it sounded quite reasonable. From Dehradoon Hotel, the pick up was very smooth and right on time. The driver stopped at very convenient places for breakfast/lunch and other breaks. The base camp was in a beautiful location. The food available there was basic and very tasty. The rooms were very cosy and view from the rooms were very good. Our trek guide, Mukesh, met us in the basecamp and briefed about the trek plan. He was very welcoming and helpful. During the entire trek, Mukesh was with us. We had an excellent experience with him. He was very accommodative and helpful. There were few places where I was slipping where he came to help me out promptly. He ensured that we are not stepping in wrong places through out the trek. It was extremely cold and rainy the time we arrived in Osla. He sensed our struggle in acclimatisation with the harsh winter condition. Mukesh was very prompt in giving us the food to the room. In the camp site as well, during the very cold condition, Mukesh delivered snacks/tea/hot water etc to the camp so that we didnt had to come out to face the wrath of cold condition. Overall I and my son, had a very good experience with Himalaya Shelter's Har Ki Dun Trek and with Mukesh especially. I will definately go with them next time for another adventure.

Kritika Patidar
5.0
Thank you Himalaya Shelter for making this one of my best experiences so far. The staff were supportive and very helpful in everything. The stays and food were awesome, we also got to explore a little bit of the local culture. Already looking forward to planning the next trek!

Neha Khare
5.0
We recently completed the Ranthan Kharak Trek with Himalayan Shelter in mid-April 2026, and it was an amazing experience. The trek is बेहद scenic with beautiful meadows and stunning sunrise & sunset views. A big thanks to Bachanji, Tanisha & on-field Team for their constant support and guidance—they made the journey smooth and enjoyable. The warm soups and delicious meals were a big comfort after long trekking days. Truly a lifetime memory. Highly recommend Himalayan Shelter for a well-organized and memorable trek!

Gayatri A
5.0
We recently did Ranthan Kharak trek with Himalayan Shelter, it was a great experience. Mr. Bacchan, Tanisha and their entire team took very good care of us. Accommodations and food was top notch. Mr Bacchan's took appropriate decisions depending on weather conditions which helped us achieve our summit. Thank you Himalayan Shelter team.

Latha Ravichander
5.0
Latha Ravichander Mumbai i have attempted my 1st Himalaya trekking. It was very nice scenic and also is was managed by excellent trek leader, Thoy & Suraj who have helped us in all the scenic places and helped us in the tough climbs. The cook & the Subhashji who take care of the horses and our luggage too for the whole trek were awesome. The early morning lemon tea, breakfast, lunch, evening snacks & dinner was very nice and yummy. One suggestion if their is senior citizen dont keep a tough route or new route in the trek. The Boslo to devsu tht jungle route was very risky & last climb was also tough. Himalaya Shelter hip hip hurray

Ashwini Khodre
5.0
Just finished the Har Ki Dun trek with Himalaya Shelter and it was unreal. Huge thanks to our guide, Surender, who really knows these mountains and kept us motivated the whole way. Also, a massive shoutout to Vijay Singh Chauhan—the food he cooked at those altitudes was easily the highlight of our nights. Best team ever!

shanti dasari
5.0
Himalaya Shelter made my Har Ki Dun trek unforgettable. A huge thanks to the Director, Bacchan Rana, who truly delivered everything he promised during booking. What made it special: Amazing Guides: Big shoutout to trek leaders Suraj and Thoiba. They are experts, super supportive, and kept us motivated. Homely Vibes: The "ghar jaisa" care was real. We felt so well looked after. Food & Stay: The food was delicious and the stay was the best we could ask for. ⭐ 5/5 Stars Bottom line: Trustworthy team and excellent service. Highly recommended!

Shilpa Kishore
5.0
Went with Himalayan Shelter to the Aancha top trek. Amazing hike, beautiful scenery and best of all, a while lot of pure white snow at the peak in the month of April! The HS team was incredible, with Nitin Bhai as the iconic guide and Micheal Bhai and Rocky Bhai being the best cooks and assistants possible. Micheal Bhai made slides on the snow on the way down, making it extremely fun to get down. Recovery from trek everyday was so instant with amazing evening snacks and chai.The team also helped make blazing campfires, making our trip as memorable possible.

Sangeeth Aloysius
5.0
We had a great time with Himalyan Shelter doing Ranthan Kharak trek. We were 10 of us, including 4 kids with youngest one aged 8… This was our third private trek in the Himalayas, and the trek with Mr Bachan and his team was undoubtedly the best. He was really flexible right from planning and ensured that he took the best calls every day to maximise both the experience and convenience. Food was absolutely the best.. Team served us local cuisines, Samosas, Rasagullas etc… We were pleasantly surprised by the yummy food we were served during the trek… Mr Bachan had great foresight about the weather and physical conditions of the entire group and ensured that he customised the plan daily for us. He would also distribute the team responsibilities in such a way that everyone can walk at their own pace without making them feel any less accomplished or supported. Would recommend Himalayan Shelter and plan to use their service again!

Pranav Patel
5.0
I had a wonderful experience during my trek to Kedarkantha last week through Himalaya Shelter. We had unseasonal snow and rainfall, however the trek was completed successfully along with Tirpan Rana who accompanied me from Himalaya Shelter. All the arrangements throughout my journey were excellent. I look forward to my next trek with Himalaya Shelter.

SUBHAJIT SAHA
5.0
I must say he is one of the best trek guide in term’s of behaviour and personality .. If you planing for go to a trekking please choose him without any hasitation ..

prasanna patgaonkar
5.0
Went for ranthan kharak april 2026 Wonderful experience, excellent food excellent arrangement specially Bachan Rana and Tanisha arranged everything perfectly .. We also had 4 kids .. they took very good care of them. The trek was conducted beautifully and we were able to walk at our own pace and maximise time with nature. Thank you team Himalayan shelter

Pim van Doren
5.0
Had a great experience! Sonu immediately made me feel at home, helping me with planning out the Har Ki Dun trek, and helping with climatizing. Mukesh was a great guide during the trek, providing everything I wanted. Also, great food at the shelter and during the hikes, props to the chefs!

Pavan Kanumalla
5.0
Amazing experience and hospitality. The full staff was so helpful and accommodating. Thoiba was an excellent guide. Highly recommend!

Chhavi Solanki
5.0
Himalaya Shelter ke saath mera trekking experience bohot hi kamaal ka raha! Shuruwaat se lekar ant tak, sab kuch bohot well-organized tha. Guide bohot supportive aur knowledgeable thhe, jiski wajah se mushkil raaste bhi aasaan lage. Khana lajawab tha aur safety ka poora dhyan rakha gaya. Agar aap ek adventurous aur hassle-free trek dhoond rahe hain, toh Himalaya Shelter is definitely the best choice. Highly recommended.👍🏻🏔️

Radka Sporre
5.0
I had an incredible solo experience on the Kedarkantha Trek with Himalayan Shelter—truly a once-in-a-lifetime journey. It was just me and the guide/team, and everything was well organized and thoughtfully handled from start to finish. A special thank you to my guide, Thoiba, who was attentive, kind, and very accommodating throughout the trek. He made me feel safe and supported every step of the way. The crew did an amazing job—the food was delicious, and reaching the summit was absolutely breathtaking. An experience I’ll never forget. I’m so grateful and would highly recommend Himalayan Shelter to anyone looking for a memorable adventure.

Pranjal Chaudhary
5.0
I've been trekking since 2020 and been on multiple treks like triund., nag tibba., chandrashila., kheerganga., kareri lake., VOF., hemkund sahib and many more but it's my first trek with himalaya shelter and I must say that it's been the most amazing experience till now. The services they gave and the hospitality and concern they showed us is really heartwarming. Our trek leaders Mukesh Bhai and Suraj bhai are the most caring and providing trek leaders I ever met on any of my treks as those are the guys u can look upto for anything. U can just get a booking with himalaya shelter and leave the rest assured to them and they will surely deliver more than u think and expect. It's been an excellent journey and I'm going to continue it with you guys for a good long period. दोबारा मिलेंगे किसी मोड़ पे., जो बाकी है वो बात होगी कभी.... 🙂🙂

Manisha Sirari
5.0
I recently completed the Har Ki Dun Trek with Himalaya Shelter, and honestly. From the very beginning, their team was super supportive, well-organized, and genuinely caring. Our trek leader Sonu was knowledgeable and made sure everyone felt safe and comfortable throughout the journey. Meals and accomodations were excellent. Big high-five to Himalaya Shelter Guest House in Sankri. I would highly recommend Himalaya Shelter to anyone planning Har Ki Dun or any other Himalayan treks. Whether you’re a beginner or an experienced trekker, they make the whole experience memorable, safe, and truly enjoyable. Planning my next trek to Buran Ghati again with Himalaya Shelter. Kudos

mayur jain
5.0
Very nice services, very accommodating, and polite behaviour of everyone from central helpline to the workforce on ground - guide, cook, drivers. Will definitely book Himalayan shelters for all my trekking plans in future, and will recommend others too.

Siddharth Sivaramakrishnan
5.0
I went on the Nagtibba trek with my 7 year old son. This was my 5th trek with Himalaya Shelter but first with my son. It was his first ever trek and he absolutely loved the experience. The arrangements were perfect with attention to small details like arranging a blanket and mattress for my son who would not have snugged into a sleeping bag. They had also arranged head torches for everyone. The food is always a highlight with simple yet delicious meals especially after a day long trek. The guides are knowledgeable and make sure it’s an experience to cherish.

Amy C
5.0
himalaya shelter review I went on the Har Ki Dun trek with Himalaya shelter in mid March. Throughout the planning of the trip they answered every question we had and were able to adjust the trek itinerary to fit our plans. My only criticism is that the weather forecast they sent us was not quite for the right place (I don’t think any exist for the actual right location of this!) so just be aware of this- if you follow their packing guidance you would have all the right stuff anyway! and anything you are missing you were able to hire on arrival in Sankri easily. Throughout the trek our guide Thoiba was excellent and always ensured our safety and comfort throughout as well as chatting to us about the local history and geography. During the trek we had a lot of unexpected snowfall and Thoiba and the rest of the team adjusted our itinerary when needed and always made sure we were as warm as possible delivering lots of warm food and chai to our tent (the food provided throughout the trek by Sanju and Thoiba was excellent and plentiful- they were also able to cater to dietary requirements if needed). All the logistics were handled seamlessly throughout with mules organised to carry all the stuff and all the tents set up normally before we had even arrived at the campsite! Overall I absolutely loved the trek- I highly recommend the Har Ki Dun trek for anyone wanting a few days of adventure with relatively easy hiking combined with some time in some remote Himalayan villages!

Ayushmaan Chakraborty
5.0
I did my first trek with Himalaya Shelter. This company was recommended to me by a friend and they do stand up to it. During our Nag Tibba trek from pickup to drop off at Dehradun they arranged it well ahead of time and in an organized manner. The staff served delicious meals and our Trek Leaders Tanisha and Risabh were professional courteous and sometimes downright funny. I would recommend the Himalaya Shelter to anyone going hiking in Uttarakhand.

Emma Lewis
5.0
Thoroughly enjoyed the Har Ki Dun trek with Himalaya Shelter! The booking process was easy and they kindly answered all our questions. Our guide Thoi Ba dealt with the unexpected snowfall very professionally and the food from our chef Sanjay was always delicious with lots of variety. Couldn’t recommend enough!

Satyam Kumar
5.0
Yeh trek experience bilkul unforgettable raha Har moment nature ke saath connect Staff bahut helpful aur friendly the Har situation mein support milta raha Guide experienced tha aur clear instructions Safety ka pura dhyaan rakha gaya Stay aur food bhi kaafi achha Simple par tasty aur energy dene wala Overall journey smooth aur well managed Definitely recommend karunga sabhi travelers ko

Sanjay Purohit
5.0
We were a group of 5 treking friends ( Nandu / Vikram / Uday / Mukund / Sanjay ) from Maharashtra with age range from 70 to 75 yrs. We have been trekking in Himalayas for more than 30 yrs. with different agencies. This was our 1st experience with Himalaya Shelters and it was very good. Mr Rana ( Himalayan Shelter ) was very coperative to accomodate our requirements. All the team members ( Leader Nitin / Guide Chandramohan / Cook Vjay / Driver cum helper Ravi ) were very helpful, cooperative & courteou

NANDKUMAR BHAGWAT
5.0
Our group consisted of 5 trekkers all senior citizens above 70 years of age. We did Bramhtal Trek on 14th March 2026 to 22nd March 2026 Rishikesh to Rishikesh via Lohajung. Mr. Bachan Rana of Himalayan shelter arranged our customized trek. Trek leader Mr. Nitin Trek Guide Mr. Chandramohan cook Mr. Vijay and driver cum assistant Mr. Ravi. Food camp management and service throughout was excellent. Tents, camp chairs toilet tents sleeping bags and dinning tent were in good condition esp. Camp at tilandi was on snow and we had no difficulty neither any inconvenience. Preparation and choice of food was very good. Entire staff was very punctual through. Selection of Home stay at Rishikesh and Lohajung was good. All in all we all were very happy with Himalayan shelter. Nandkumar Bhagwat

Uday Paranjpe
5.0
We, 5 friends all between 72 to 75 years young did Brahmatal Trek with Himalaya Shelter on 14 to 22 March 2026. Bachan Rana helped a lot to customise our program details. I must mention here that our Trek Leader Nitin was very caring and humble. Special thanks to our cook, Vijay for very tasty and variety preparations. Our local guide, chandramohan from Govid Ghati was very knowledgeable. Our driver, Rabi, was careful. Although the wheather suddenly changed to snowfall and rains, the support team was ready for all eventuality. All in all I can say that Himalaya Shelter and the trek support team made our trek a comfortable, memorable experience.

Hardik Khandelwal
5.0
It was an amazing trip, Pravesh (PK) bhaiya and Santosh bhaiya were very helpful, the food provided was also nice, very helpful whenever we needed help

Katheryn Antonio
5.0
I had an amazing experience. The village (Pantwari) was so cute, Nitin was so helpful and respectful the entire time. My only downside at Nag Tibba was that the dogs didn’t stop barking and the tent I slept in was on a downslope which means I felt like I was slipping all night. Regardless, the views were beautiful. I felt so safe and comfortable. Every driver and person was so warm. The food was delicious too, I do recommend bringing a snack for the summit, hiking poles and warm layers. Also ANTI NAUSEA meds for the windy roads. MUST.

Tridibesh Misra
5.0
Very good management and super friendly people. Driver was very good and experienced. Food from day one till the end was very tasty. Guide (PK bhaiya) was super chill and always motivated us during the trek. Overall wonderful experience.

Ayush Sharma
5.0
Staff(driver + guide + cook) was very friendly and helped a lot throughout the trek. Food was very tasty from day one till last day. Accomodation was good and the equipments including rental gears were of great quality. Enjoyed the trek and will recommend to go with Himalaya Shelter as your travel companion.

Sanjay Sorathiya
5.0
It was excellent experience and fantastic tracker guide of Himalaya shelter team Mr. Sonu best tracker and nice food arrangements and good service

brgajipara
5.0
Completing the Aancha Top Trek with my friends was one of the best experiences I’ve had in the mountains. A big thank you to Himalayan Shelter for organizing such a wonderful trek. The entire team was very professional, friendly, and supportive from start to finish. Our trek leaders and guides were experienced and always motivated us during the journey. The food, campsite arrangements, and overall management were excellent. The highlight of the trek was definitely the stunning view from Aancha Top. Standing there with friends, surrounded by the beautiful Himalayas, was truly unforgettable. I highly recommend Himalayan Shelter to anyone who wants a safe, well-organized, and memorable trekking experience.


Bhavdip Ravani
5.0
Accommodation supper Staff co-operative Food delicious Sherpa helpfull, well knowledged, well trained ⭐⭐⭐⭐⭐

Amish Patani
5.0
Kedarkantha + Har Ki Dun treks with Himalaya Shelter is sheer bliss. Service + Knowledge + taking care of smallest things = Return for more. We loved the entire experience and will be doing all future treks with them. Keep up the good work and spread your wings. India has so much to offer at such good price to unwind...

Pankaj Shukla
5.0
I would like to share my sincere appreciation for Himalayan Shelter for organizing our trek to Kedarkantha. From the very beginning, all arrangements were exceptionally well planned and professionally managed. The coordination, communication, and on-ground execution reflected a high level of experience and commitment. The support staff were courteous, helpful, and always ready to assist, ensuring that every participant felt comfortable and confident throughout the journey. The trek was structured in a disciplined and well-paced manner, which enabled us to achieve the summit safely and successfully. Their focus on planning, safety, and teamwork truly enhanced the overall experience and made the achievement even more meaningful. I had a wonderful experience and would highly recommend Himalayan Shelter to friends and colleagues who are looking for a reliable and professional trekking organization. Thank you for making this journey memorable and rewarding. Pankaj Shukla

Tack gaming
5.0
The trek was fantastic. The guide was really helpful and patient. He took everyone to the summit with great pace. The food and tents were set up before we reached our destination allowing us to rest properly. The food was also made at site which was great as to have hot food at such a place was luxury. The team from Himalayan shelter guided us and made our journey better. If I were to go on another trek I would definitely choose Himalayan Shelter again.

Thibault Dargere
5.0
My experience trekking to Chandrashila with Himalaya Shelter was excellent, especially as a beginner-friendly introduction to the mountains. The team was incredibly experienced and well-prepared, providing two guides and a driver who were all exceptionally kind and professional; a special mention must go to Mukesh, whose expertise made the journey feel seamless. While the guides were fantastic and the route was very welcoming, the itinerary did have a fair amount of downtime each day, and I personally feel the schedule could have been a bit more compact. Overall, it was a great trip led by a staff that truly knows their craft.

SHREYA K 19ABARC047
5.0
We had a good experience with Mr. Tirpan singh as captain. He was very helpful and even the food was very tasty sanju bai and anil made sure we eat proper food at all the times . The whole stafff was very helpful trhough out the trek


Bianca Nuti
5.0
Great experience with Bachan Rana and Mukesh in the trekking through the Kunjapuri temple and Neer waterfalls! We all loved it, they were very kind and careful to make it unforgettable! Thank you guys

Caterina Giannessi
5.0
Veramente un bel tour e trekking a rishikesh. Ci hanno potato con una jeep in vetta a vedere l’alba sui picchi dell’himalaya, poi siamo scesi lungo la montagna per circa 9 km. I ragazzi ci hanno aiutato nella discesa e ci hanno portato e preparato la colazione con roti, uova, patate e The e caffè durante il trekking. Veramente consigliato!

Sudhakar Tetali
5.0
The last two days were hectic in enjoying the treks in and around Rishikesh and Pantwari in Uttarakhand. As a beginner and at 60 years of age, it was tough for me to do these treks but I enjoyed it as a challenge and tested my lungs and heart functioning to the max limit. I travelled this trip solo but met a few very young guys from Delhi/Ghaziabad who were part of the trekking group. These guys were awesome and full of energy. I chose Himalayan Shelter as my tour guide and Bachan Rana was very helpful in arranging everything and he is very experienced in this business and as an accomplished trekker . I believe trekking/hiking gives you soul satisfaction and one of the best ways to make new friends. Overall the Rishikesh trip added a new perspective on how to lead a single life and deal with physical challenges.

Samwise Patterson
5.0
We had an awesome experience with the entire Himalayan Shelter team! Our guides were Bachan rana, and Ramesh sajwan and they both an amazing job taking care of us. They knew the trails very well, they took care of our needs at camp like food and shelter and ensured our safety during the entirety of the journey. If you get the chance, please take this adventure with the Himalayan Shelter team!

Izzy Bernbaum
5.0
Some of the nicest guides and best views you could imagine highly recommend.

Gordon Gogulski
5.0
Best experience ever, very caring and make the best food. Highly recommend.

Paige Alcorn
5.0
absolutely beautiful hike and the guides were amazing, open to answering questions and making the whole trip!!

Reema Kuwar
5.0
I recently trekked to Kedarkantha with Himalayan shelter. I would like to appreciate the whole team, for their cooperation, patience and making the submit a success. Special thanks to Nitin, Sonu and Arjun, to make sure, everyone took part in the trek, and for their genuine help to all the trekkers. The food was fabulous as well. Thanks for your, help and guidance team.

Ankit Kundra
5.0
Himalaya Shelter is an excellent trekking company. The staff was extremely cooperative, and the rooms were clean and hygienic. The food was outstanding — easily 5 stars. Our trek leader, Saurabh, was highly experienced and continuously guided, motivated, and supported us throughout the trek. The Kedarkantha trek itself was an unforgettable, once-in-a-lifetime experience that gave us a bag full of memories and valuable life lessons. If you’re looking for a reliable and well-organized trekking company, Himalaya Shelter is a great choice.


Archish Vasu
5.0
Recently I had an amazing experience on the Kedarkantha Winter Trek with Himalayan Shelter, and a big part of that was thanks to Tanisha Chauhan our trek lead. From the very beginning, she was extremely helpful, professional, and supportive. She guided us clearly with all the trek details, preparations, and logistics, which made the entire journey smooth and stress-free. During the trek, her coordination and constant encouragement really stood out, especially in the challenging winter conditions. Tanisha’s positive attitude, dedication, and care for every trekker made this experience truly memorable. I’m very grateful to her and highly recommend Himalayan Shelter—and especially Tanisha—for anyone planning a Himalayan trek.


Manish Kukreja
5.0
Yes, ~12,000 ft / ~3,600 m! We did it with the exceptional team at Himalaya Shelter. We are a family of four with two boys (11 and 12 years old), and this was our first Himalayan trek at Dayara Bugyal. We were picked up from Dehradun Airport and driven to Uttarkashi, where we stayed for a night. The next day, we drove to Raithal and started our trek to the Gui campsite, spending the night in alpine tents at freezing temperatures of -1°C. On the second day, we walked about 8 hours in total and scaled the highest point of Dayara Bugyal (~12,000 ft). That evening, our cook, Subhash ji, presented us with a surprise cake during dinner to celebrate the moment. The night was even colder at -4°C, and the peaks saw some snowfall. On the third day, we descended to Raithal and drove back to Uttarkashi for the night. On the final day, Bim (Sasi) and the Himalaya Shelter team dropped us off in Rishikesh to continue our adventures in Dev Bhoomi, Uttarakhand. We would like to thank the entire Himalaya Shelter team: Bachan ji and Tushar for booking and operational assistance; Tanisha, our trek leader, for guiding us and being patient and encouraging with our children; Sonu for providing overall guidance, care, and sharing his experience throughout the journey; and Subhash ji for the amazing, thoughtful, and yummy food, as well as accommodating our requests. Finally, not to forget Bim (Sasi)—a safe pair of hands behind the wheel who made the whole trip safe and comfortable. Thank you! We hope to continue this relationship with another adventure—maybe Har Ki Dun?!

Devanand Jethanandani
5.0
It was very wonderful trekking experience of Ancha Trek we had with Himalay Shelter.. Very delicious food we enjoyed on the entire trip and thanks to the cook Bijay Singh Overall experience was memorable one.

Jitendra Teelani
5.0
We completed the Ancha Top trek with Himalayan Shelter, and overall it was a great experience. The arrangements were well managed and the service was amazing. A special mention for the food — it was truly awesome, which made the trek even more enjoyable in such cold conditions. Huge thanks to Vijay (MAMA) for the delicious food and warm hospitality 🙏 — it really felt like home on the mountains. However, we would like to share one concern. We were a group of 8 people, and unfortunately, we felt that the guide Mukesh was mostly involved with one foreigner guest, due to which our group was often left on its own. This affected our overall experience and group coordination. We hope Himalayan Shelter will look into this and ensure equal attention and support to all trekkers in a group. Overall, a memorable trek with great food and service, with scope for improvement in guiding support.

Alpeshbhai Kachhadiya
5.0
GOOD SERVICE COOK IS VERY GOOD "BIJAY SINGH" HIS COOKING IS VERY DELICIOUS HIMALAYA SHELTER GROUP MANAGEMENT IS TOO GOOD WITH CUSTOMER WE FEEL LIKE FAMILY PERSON

Mehul Patel
5.0
Food was so good. Special thanks to Mr. Bijay singh Hospitality and all arrangements also very good Ancha Top trek


Sourabh Unnikrishnan
5.0
Had a fantastic time with the team during my Dodital trek and Aancha top trek. Their warmth, care and expertise gave no room for discomfort at anytime. It was a great get away with friends while seeing each other a little outside our comfort zones. Highly recommended!

Anagha Ghorpadkar
5.0
We had a fantastic trek with Himalayan Shelter in dec 2025. We were a group of 14 people. Right from the time we reached Dehradun and until our drop back to Rishikesh, the entire journey was very well arranged. Timely pick up, comfortable road trip in a TT to Raithal, trek preparations, the lovely Pahadi food, comfortable stay at Raithal was just awesome. Through the trek, Mr Bachan Rana and Mr. Abhimanyu were very enthusiastic and encouraging. Rocky was a hero for us- always with a smile and serving us yumm food. The kids loved him as he gave them super maggi 😊. Anything we asked Rocky said - “ho Jayega” which put all our questions to rest. Our first Himalayan trek and it was made memorable with Himalayan Shelters. They made it comfortable as home in the Himalayas 😊. Looking forward to more adventures with them.

Sanwar mal Yadav
5.0
Had an amazing experience doing the Aancha Top trek with Himalayan Shelter. The team was professional, well-organized, and super supportive throughout the journey. Great stay, tasty food, and breathtaking views! Highly recommended for anyone planning a Himalayan trek.

Vaishali Bathvar
5.0
Amazing place, view and special thanks for the co-operative staff #mr.Nitin#mr.Ramesh our treker they gave us best treking experience and they are too polite persons , and hotel staff they gave best hospitalise #mr.subhas#mr.sooraj raja # mr. goldi Specially recommend this place plz visit and enjoy your trek.😊 Rooms are better also☺️

Ashmita Chatterjee
5.0
I have been travelling with Himalayan Shelter for two years now, and it has been an absolutely wonderful experience. The guides are extremely knowledgeable, talented, and responsible. They were also very generous and supportive throughout the trek, always ready to help and motivate everyone. Thanks to their excellent planning, guidance, and constant encouragement, the trek never felt exhausting at all. Safety, comfort, and group morale were clearly their top priorities. I felt well taken care of at every step.

Iftiker Alom
5.0
This trek turned out to be completely unexpected in the best possible way. Although everything was unplanned, the entire journey unfolded beautifully and was full of pleasant surprises. Bachan Da’s storytelling and the way he shared his experiences throughout the trek made the journey truly special, it was engaging, warm, and memorable. The homestay arrangements were excellent comfortable, welcoming, and well managed. The service provided throughout the trek was outstanding, and the care and support from both Bachan Da and Rocky Da were genuinely exceptional. Their company made the trek even more enjoyable and reassuring. The summit was breathtakingly beautiful and absolutely worth the effort. Both the journey and the destination were remarkably scenic and enriching. Overall, it was an unforgettable experience, and I would highly recommend trekking with them to anyone looking for a meaningful and well guided adventure.

Lavish Thakurgota
5.0
Best trekking company special HARSH bhai you are best and very gentle person. Supported everyone in the group.

Manuraj Tomar
5.0
Went solo, came back with amazing memories and new friends 🤍 Thanks to everyone for making this trek special—and special thanks to Nitin and Tanisha for taking such great care of us!

Nitin
5.0
Everyone along the journey were very kind and hospitable, it was my first trek and they made sure it's a memorable one!

Rajashree Joshi
5.0
Just completed a trek to Dayara Bugyal with HimalayaShelter. We had a wonderful experience thanks to the team. Not only were the arrangements top-notch, but their flexibility with our plan changes, genuine warmth, encouragement, and of course, the yummy hot food served lovingly made it all the more special. Highly recommend Himalaya Shelter.

Shashishekhar Chaugule
5.0
Trust Bachchan and his team at Himalaya Shelter for a well-organized, comfortable trek. We did Dayara Bugiyal with them in December 2025 and would surely love to come back for more.

Vineet Dravid
5.0
We trekked with Himalaya Shelter in Dec '25. The entire trek was excellently organised. Attention to detail was commendable and every possibility was accounted for by the team. The entire team was committed and worked from 4 to 10 to ensure the trek was incident free and pleasurable. Special mention to their commitment to the environment. They minimised waste and there was no plastic throughout the trek. Highly recommended!

Koustav9
5.0
It was a great trek❤️❤️ The behaviour and the familiarity they have the shown in the entire tour was amazing. Looking forward to some more adventures with this group😊😊

ratnesh pandey
5.0
We organized our team offsite for 23 member team through Himalayan Shelter, and the experience was absolutely outstanding. From start to finish, everything was managed with great care and attention to detail. Tushar and Bachan added thoughtful personal touches throughout the journey, ensuring that every small requirement was taken care of during our trek from Chopta to Chandrashila. Our CEO and CTO joined us from the US, and they thoroughly enjoyed every bit of the experience, which speaks volumes about the quality of planning and execution. The food and accommodation were extremely hygienic, comfortable, and well-organized, and the transportation arranged for the team was smooth and top-notch. Overall, Himalayan Shelter went above and beyond to make our offsite memorable, seamless, and truly enjoyable. Highly recommended for anyone looking to plan a well-curated and hassle-free trekking or team offsite experience in the Himalayas.

Vishal Reddy
5.0
Had a wonderful experience at Kedarkantha. The trek was beautifully organized, and the entire journey was smooth and memorable. A special mention to our guide Tirupan Rana — extremely knowledgeable, calm, supportive, and always motivating throughout the trek. He ensured everyone felt safe, comfortable, and confident, especially during challenging sections. His local insights and positive attitude truly enhanced the overall experience. The arrangements, food, and campsite management were well taken care of, making the trek enjoyable even in tough weather conditions. The only minor drawback was the unavailability of hot water for bathing, which was manageable considering the terrain and weather. Overall, a fantastic experience and highly recommended — especially with a guide like Tirupan Rana, who made the trek even more special.

skarate academy
5.0
Good trekking experience Food was good and Trek leader trepan bhai was good and explained well and took good care of us

Syed Saif Ali
5.0
"5/5 ⭐️ Amazing experience with Himalaya Shelter! 🔥 From transport to tents, food to guides – they took care of everything! 😍 The trek leader was super supportive and knowledgeable, made the Kedarkantha trek a breeze 💪. Food was delicious and hot, even in the freezing cold 🍲❤️. Hospitality was top-notch, felt like home 🏡. Highly recommend for a hassle-free, memorable trek! 👏"
Gallery
!
Exciting Images coming Soon
We’re currently working on curating the best visuals for this trek. Stay tuned — stunning images will be coming your way very soon!
Read more on Ranglana Peak Expedition
!
Exceting Blogs/Trek Diaries coming Soon
We’re currently working on bringing together insightful blogs for this trek ✍️ Stay tuned, detailed stories, tips, and everything you need to know will be coming your way very soon!
Ranglana Peak Expedition FAQs
!
Frequently Asked Questions Coming Soon
We’re currently working on compiling helpful answers for this trek 💬 Stay tuned, clear guidance, common queries, and everything you need to know will be coming your way very soon!
Available Dates
From
₹110000 $1257
per person